sample monoprint This seems a difficult technique because not only is the image reversed when printed, but while working on the plate it is hard to see what the final effect will be when the print is made.
However, if using plexiglass, you may find it rather easy to hold the plate against the light to see what the final effect will be; constantly checking while working the ink around the plate, seems the best solution.


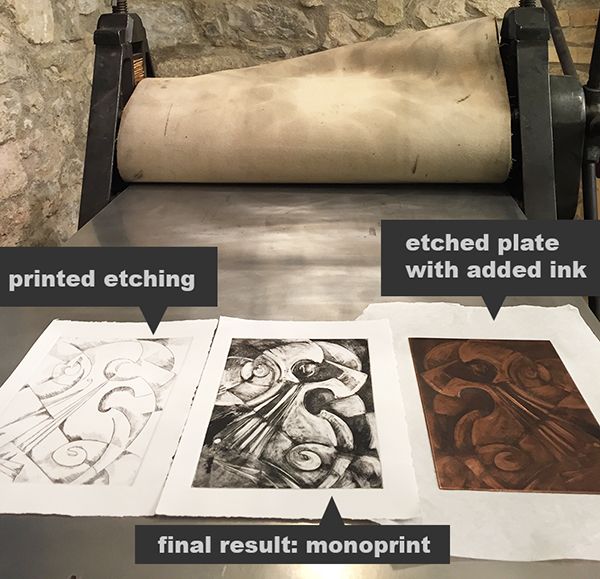
Because monotype printing allows considerable freedom in the approach to imagery, this is considered to be a very versatile method.
The artist can decide to work positively or negatively, to use waterbased or oil based inks, and may also incorporate other materials to be printed or to use as stencils.
Working positively means that the artist will add ink onto the plate with brushes, rollers, fingers, etc.
Working negatively means that ink is removed with hands, rags, cotton swabs or anything pointed. The directness of painting directly on the plate requires skills of drawing and painting as well as a sure hand and a considerable degree of spontaneity.


to get started, all you need is a plate, some ink and paper.

  • For your plate you can use:
    • Thin plexiglass, acetate or mylar
    • Etching plate
    • Cardboard sealed with gesso, acrylic paint or glue
    • Discarded zinc or aluminium plates
    • Vinyl
  • Etching or litho ink (oil paint can also be used)
  • Printmaking paper (the best type is lightweight)
Once you have a plate, just paint directly on it with etching or lithography inks using any kind of brush. After the image is painted, put the plate on a press bed, carefully place previously dampened paper on top, and run your plate and paper through a press using light or moderate pressure.

Depending on the effects you want, you can use a variety of tools for painting the image; not only brushes, but also fingers, toothbrushes, foam brushes, sticks, sponges, feathers and anything that can scratch a plate such as needles, scissors or etching equipment.

Special effects can be achieved by dabbing solvents such as mineral spirits or turpentine to your inked plate, allowing the solvent to dissolve the ink so as to create beautiful reticulate marks.

Another method of producing images allows to work negatively from dark to light by wiping off ink from the plate rather than adding it. First use a brayer to roll out a flat area of ink on the plate and then wipe away areas with a rag or cotton swabs and solvent to create lights and tones. For textural effects, ink can be also removed with brushes, sponges or sticks just like Degas and Matisse used to do.

Another simple but effective method of producing monotypes seems to have been invented by Gauguin. This method, called direct trace drawing, produces a linear monotype that has a unique soft edged quality similar to the tone and line in soft ground etching. All you need to do is evenly ink a plate, place a piece of paper over the inked image area and then draw the image directly on the back of the paper, the lines drawn will be transferred and a reverse image produced. Massing lines together will produce darker areas while hand rubbing will create softer tones; by varying the pencil pressure and using different kinds of widths and hardnesses, different effects are obtained.


USING WATER-BASED INKS

Monoprints can be created also by using water-soluble materials such as watercolors, crayons, watercolor pencils, watercolor felt tip pens or commercially produced monoprint inks (Akua-Kolor, Createx or Green Drop Inks).
Prior to drawing, the plate to be used (usually plexiglass) needs to be finely sanded and the edges bevelled. This will allow the color to fix better on the plate and make it easier for you to draw/paint. Using a sponge or a brayer, apply a thin even coat of hand soap to the entire printing surface and allow it to dry. The soap will perform as a releasing agent and allow the colors to lift during printing.
Draw directly onto the surface of the plate with the water-soluble materials, letting the color dry for a few hours prior to printing. The paper to print on should be damp, but not excessively wet unless you want the colors to "run".
When printing, the moisture in the paper will reactivate the drawing/painting materials, allowing for the transfer of the color to the paper.
Run the plate through the press with moderate to heavy pressure. This will give you the best impression. Prior to removing the printed image. Check the impression quality by lifting one corner of the printed paper and check the image. If the impression is not satisfactory, lightly spray/sponge the back of the paper with water and run it through the press again. Pressure also plays a great part in a successful transfer: if too light, not all ink will transfer; if too heavy, the paper will stick to the plate and the artwork is ruined.

A good rule of thub is to test the pressure of the press prior to printing the image: run a plate through the press (with the same thickness as the plate you are using) with a simple ink mark or drawing to see whether all ink or little ink is transferred.

You can be interested in : The difference between monoprints and monotypes

Share this Post