 You don't need expensive materials to introduce printmaking into your classroom:
You can use oil paint as a substitute for printmaking ink (acrylic paint won't work).
In this visual arts lesson, students will create a print using whatever is available in the classroom.
OBJECTIVES AND OUTCOMES
Learners will understand the concept of creating an image in reverse, especially when adding text.As well as basic art skills, they will demonstrate planning skills.
Materials needed
- Printmaking ink - or - oil paint (for best results, only use black)
- one sponge per student
- paper towels
- cartridge paper
- cooking oil for clean up
- pen or pencil
- Each student needs one sheet of A4 size of plexiglass (you can get it from an old cheap picture frame)
- one plastic tray to share among 3-4 students
procedure
opening to lesson
Begin by explaning that a print is basically ink transferred from one surface to another. It is characterised by a reverse image being obtained when the image is printed. Adding text is crucial because letters need to be written in reverse.Tell them that they will be making a print of their own and this method is called Direct Transfer method, which was invented by Paul Gauguin.
body of lesson
- Have students draw a picture without any shading on the paper they will print on. The print will happen on the front - their image will be drawn on the reverse side of the paper.
- Ink or oil paint is dabbed onto their A4 sheet of plexiglass using a sponge in order to cover the plate completely with a thin layer of ink or paint. The best practice is to spread little ink or paint onto a tray and lightly tap a sponge to pick up some paint which is then transferred by dabbing onto the plexiglass
- Have students take their drawing to place onto the plexiglass - their drawing must face up
- To keep the paper firmly in place, it is advisable to tape the paper down
- Without touching the surface of the paper too much, students can now trace over their drawing using a pen or pencil
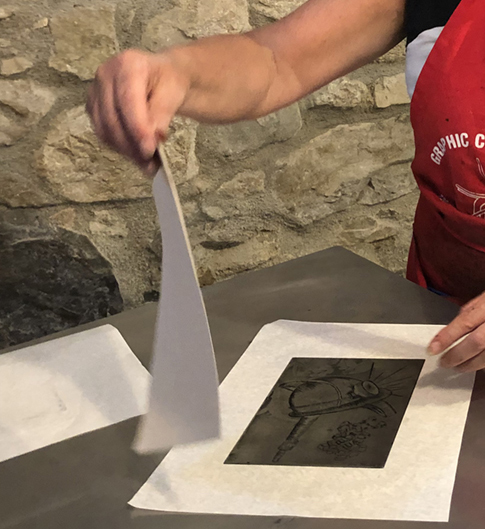
- Once finished their tracing, they can gently lift one corner of the paper and pull up their paper to reveal their final print.
- In case a student has forgotten to trace some areas of their drawing, they can place their sheet back onto the inked plexiglass - registration or proper alignment is not important as ink is transferred anyhow.
CLOSING
Display all prints and ask students to find out what is the common feature among all the designs (the answer is: linework is of a chalk appearance. This is due to the kind of technique employed)You can be interested in : The difference between monoprints and monotypes